skitty-notes | Markdown Sticky Notes app in Neovim in the Kitty Terminal
Do you spend most of your day in Neovim or Vim and would like to have a sticky notes app that uses vim motions, allows you to have markdown links, view paste images, use markdown headings, snippets, basically anything you can do in a Markdown file when in Neovim?
Skitty-notes will run in a terminal application, my main terminal is Ghostty, so I’m using kitty to run it on the right side
If you also want to use kitty, make sure you install it first
What is skitty-notes?
I’m used to vim motions way too much, and when I have to use an app that doesn’t have vim motions it’s pretty hard for me to move around and manipulate text
So I was looking for a sticky notes app that allowed me to do this, unfortunately there is not (that I’m aware of) so decided to use my own Neovim config with some slight modifications, and I can use all my keymaps, vim motions, etc
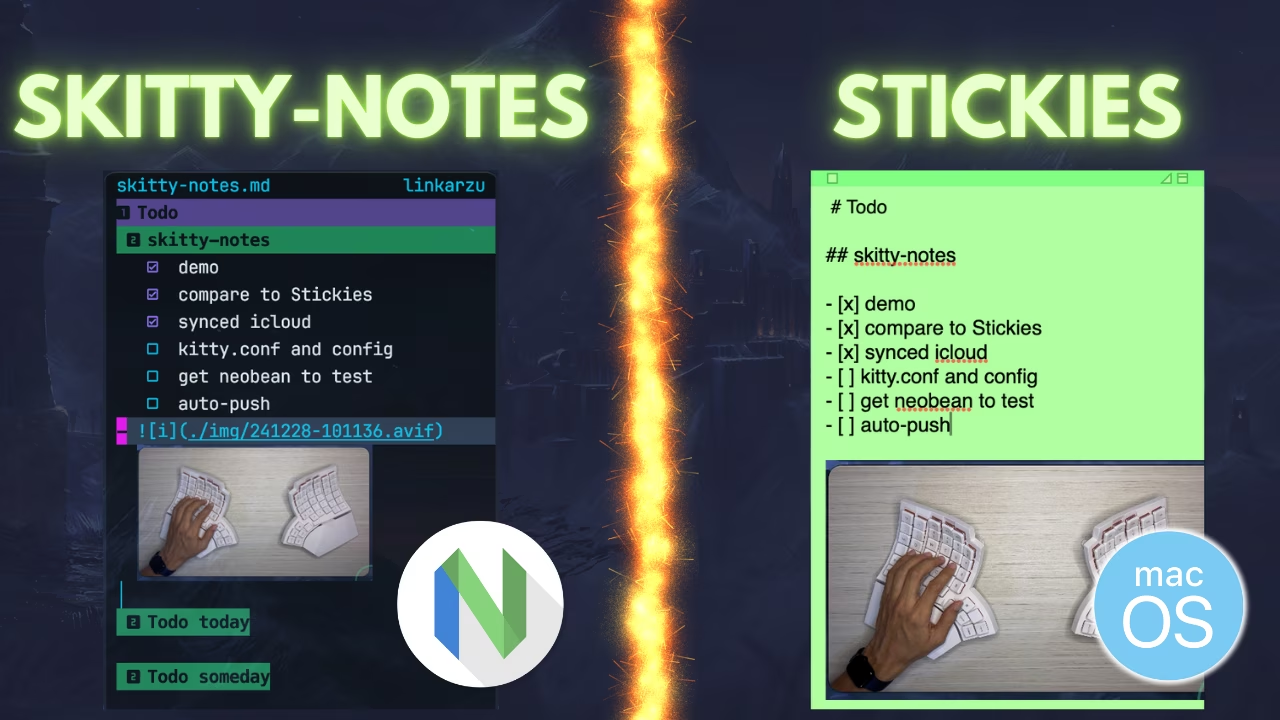
skitty-notes is the app you see on the right side
You can see skitty-notes on the right
Why the skitty-notes name?
Since I was looking for a sticky notes app and I decided to use kitty, just added an s in the front of kitty and that was basically it
Where do I store this skitty-notes.md file
In the video you’ll see that I store this file in icloud, but my personal recommendation is, don’t do that, instead of storing it in icloud, I personally keep track of the file in github, I created a private repo and a script that auto pushes changes, similar to the git plugin in obsidian
I did have the file in icloud and also at the same time I was tracking it in github, but was getting a github error fatal: mmap failed: Resource deadlock avoided
So my personal recommendation, to avoid issues, just keep it out of icloud or any other cloud syncing service
Apple Stickies app
If you’re on macOS there’s a native alternative for this, called the Stickes app
This application does not even support markdown formatting, let alone vim motions, it works as a basic and not useful sticky notes app
macOS Stickies app
Configure skitty-notes
Configure kitty
When I open kitty, I want it to automatically open a specific markdown file in neovim, so in my kitty.conf file you will notice that there’s a shell bash --login -c command
Starting neovim with the –listen flag to create a socket at /tmp/skitty-neobean-socket
This allows the ~/github/dotfiles-latest/scripts/macos/mac/400-autoPushGithub.sh script to trigger buffer writes and refresh lualine
I’m cleaning up the socket before start with rm -f /tmp/skitty-neobean-socket, otherwise it’s left there from a previous run and it just stops working
All the other settings and flags are documented already in my dotfiles, so go and read the comments in this file to understand more kitty.conf file
Read the heading below to understand how to open kitty in the same place and of the same size all the time
Notice that in the command above, there’s this section ~/github/dotfiles-latest/yabai/positions/kitty-pos.sh
This script is the one that allows me to open kitty in a specific section on my screen, and I always want to open it of the same size
This is done in macOS using a window manager, in my case I use Yabai, so if you go through the script you’ll be able to see the commands that position kitty and also resize it
Just remember to make your script executable
Many folks use Aerospace now instead of yabai, I haven’t tested it yet, because I think I’ll be missing some features, but I will, and probably create a video on how to make skitty-notes work with Aerospace
Remember that we’re passing an env var from kitty, NEOVIM_MODE=skitty, I use this variable to modify the skitty-notes configuration, an example is lualine, it looks different in my regular Neovim config compared to the skitty notes version
You can print the env var with:
:lua print(vim.env.NEOVIM_MODE)
Here we capture the environment variable to make it accessible to neovim
1
vim.g.neovim_mode=vim.env.NEOVIM_MODEor"default"
Also in the same init.lua file I added this
1
2
3
4
5
6
7
8
-- Delay for `skitty` configuration-- If I don't add this delay, I get the message-- "Press ENTER or type command to continue"ifvim.g.neovim_mode=="skitty"thenvim.wait(500,function()returnfalseend)-- Wait for X miliseconds without doing anythingend
Modify plugin settings based on NEOVIM_MODE
Modify options.lua file
I’d say this is the most important file, because this is where you modify for example the textwidth I normally configure that as 80 in my regular neovim config, but in skitty-notes I set it to 28, because I want it to move to the next line when typing
I don’t need relativenumbers when in skitty notes, so I disable that there
I also modify how winbar looks
Here’s part of the configuration to get you inspired
Notice the else at the bottom is for my regular neovim config
Remember that all of these configurations are in my dotfiles
1
2
3
4
5
6
7
8
9
10
11
12
13
14
15
16
17
18
19
-- Conditional settings based on modeifvim.g.neovim_mode=="skitty"then-- Line numbersvim.opt.number=falsevim.opt.relativenumber=false-- Text width and wrappingvim.opt.textwidth=28localcolors=require("config.colors")vim.cmd(string.format([[highlight WinBar1 guifg=%s]],colors["linkarzu_color03"]))-- -- Set the winbar to display "skitty-notes" with the specified color-- vim.opt.winbar = "%#WinBar1# skitty-notes%*"-- Set the winbar to display the current file name on the left and "linkarzu" aligned to the rightvim.opt.winbar="%#WinBar1# %t%*%=%#WinBar1# linkarzu %*"else-- I never used relative line numbers, so fuck that-- Edit a few days after, I'll give them a try again, so re-enabled themvim.opt.relativenumber=true
I also change the cursor color in the same options.lua file
1
2
3
4
5
6
7
8
9
-- I also want the vim.g.neovim_mode cursor color to be changed-- Neovide cursor color, remember to set these in your colorscheme, I have-- mine set in ~/github/dotfiles-latest/neovim/neobean/lua/plugins/colorschemes/eldritch.lua-- Otherwise, my cursor was whitevim.opt.guicursor={"n-v-c-sm:block-Cursor",-- Use 'Cursor' highlight for normal, visual, and command modes"i-ci-ve:ver25-lCursor",-- Use 'lCursor' highlight for insert and visual-exclusive modes"r-cr:hor20-CursorIM",-- Use 'CursorIM' for replace mode}
Modify img-clip settings
Let me give you a few examples of some plugin configurations I changed that depend on the NEOVIM_MODE being used
One of the plugins I changed is ~/github/dotfiles-latest/neovim/neobean/lua/plugins/img-clip.lua, look at the configuration below
So if the neovim_mode is skitty, which means that I’m running the skitty-notes app, set the image directory to img
1
2
3
4
-- Conditional dir_path based on skitty modedir_path=vim.g.neovim_mode=="skitty"and"img"orfunction()returnvim.fn.expand("%:t:r").."-img"end,
Modify image.nvim plugin settings
I want to have smaller images in skitty-notes compared to my regular neovim config
Notice below that if on skitty-notes the image height is 30, but if on my regular neovim config its 40
1
2
3
4
5
6
-- This is what I changed to make my images look smaller, like a-- thumbnail, the default value is 50-- max_height_window_percentage = 20,-- max_height_window_percentage = 40,-- 40 for my default nvim config and 30 for skittymax_height_window_percentage=vim.g.neovim_mode=="skitty"and30or40,
Modify lualine settings
Notice below, I’m disabling all the different lualine sections, except for lualine_x, because all I want to see in skitty-notes is if I have pending changes to push to github
Notice the else at the bottom of the code below, that means that if not in skitty-notes you will see all your lualine items when using our regular neovim configuration
opts=function(_,opts)ifvim.g.neovim_mode=="skitty"then-- For skitty mode, only keep section_x and disable all othersopts.sections={lualine_a={},lualine_b={},lualine_c={},lualine_x={{"diff",symbols={added=icons.git.added,modified=icons.git.modified,removed=icons.git.removed,},},},lualine_y={},lualine_z={},}elseopts.sections.lualine_c={
Disable some plugins for skitty-notes
I don’t need the CopilotChat.nvim plugin when using skitty-notes, so I want to disable it, notice how I do that below
1
2
3
4
return{"CopilotC-Nvim/CopilotChat.nvim",enabled=vim.g.neovim_mode~="skitty",-- Disable for skitty modeopts=function(_,opts)
Do I need to use kitty?
No, you can use any terminal emulator, the only reason I use kitty is because it allows me to view images in neovim and I actually don’t use kitty for anything else
My secondary terminal, in case I need to bring up a 2nd one, is wezterm, but I could have used wezterm instead of kitty, no issues there
You can use any terminal even if it does not support images
Test out my Neobean config
Do you want to test this but not spend time configuring it?
My entire neobean setup is in my github repo, so you can grab it from there
I have a video in which I show you how to download and setup my neobean config, but also other neovim distributions, so I highly recommend you check it out:
If you don’t want to watch the video above, and you already have your own neovim config, and want to quickly get started and follow along in this tutorial
Run the git clone commands below to clone my dotfiles in your .config directory and we will run my config below
I created this script, remember that you can find it in my dotfiles, it automatically pushes the changes I have in skitty-notes and also in my obsidian repo every 3 min
Do you want to promote yourself in my channel? I’m not talking about a company like notion, brilliant, and all those other ones we’re using to seeing. I’m talking about you as a person, do you have a project, course, youtube channel or product and trying to reach an audience?
If interested, pricing and all the details can be found in this other page
You’re a fraud, why do you ask for money, isn’t YouTube Ads enough?
I explain all of this in the “about me page” link below:
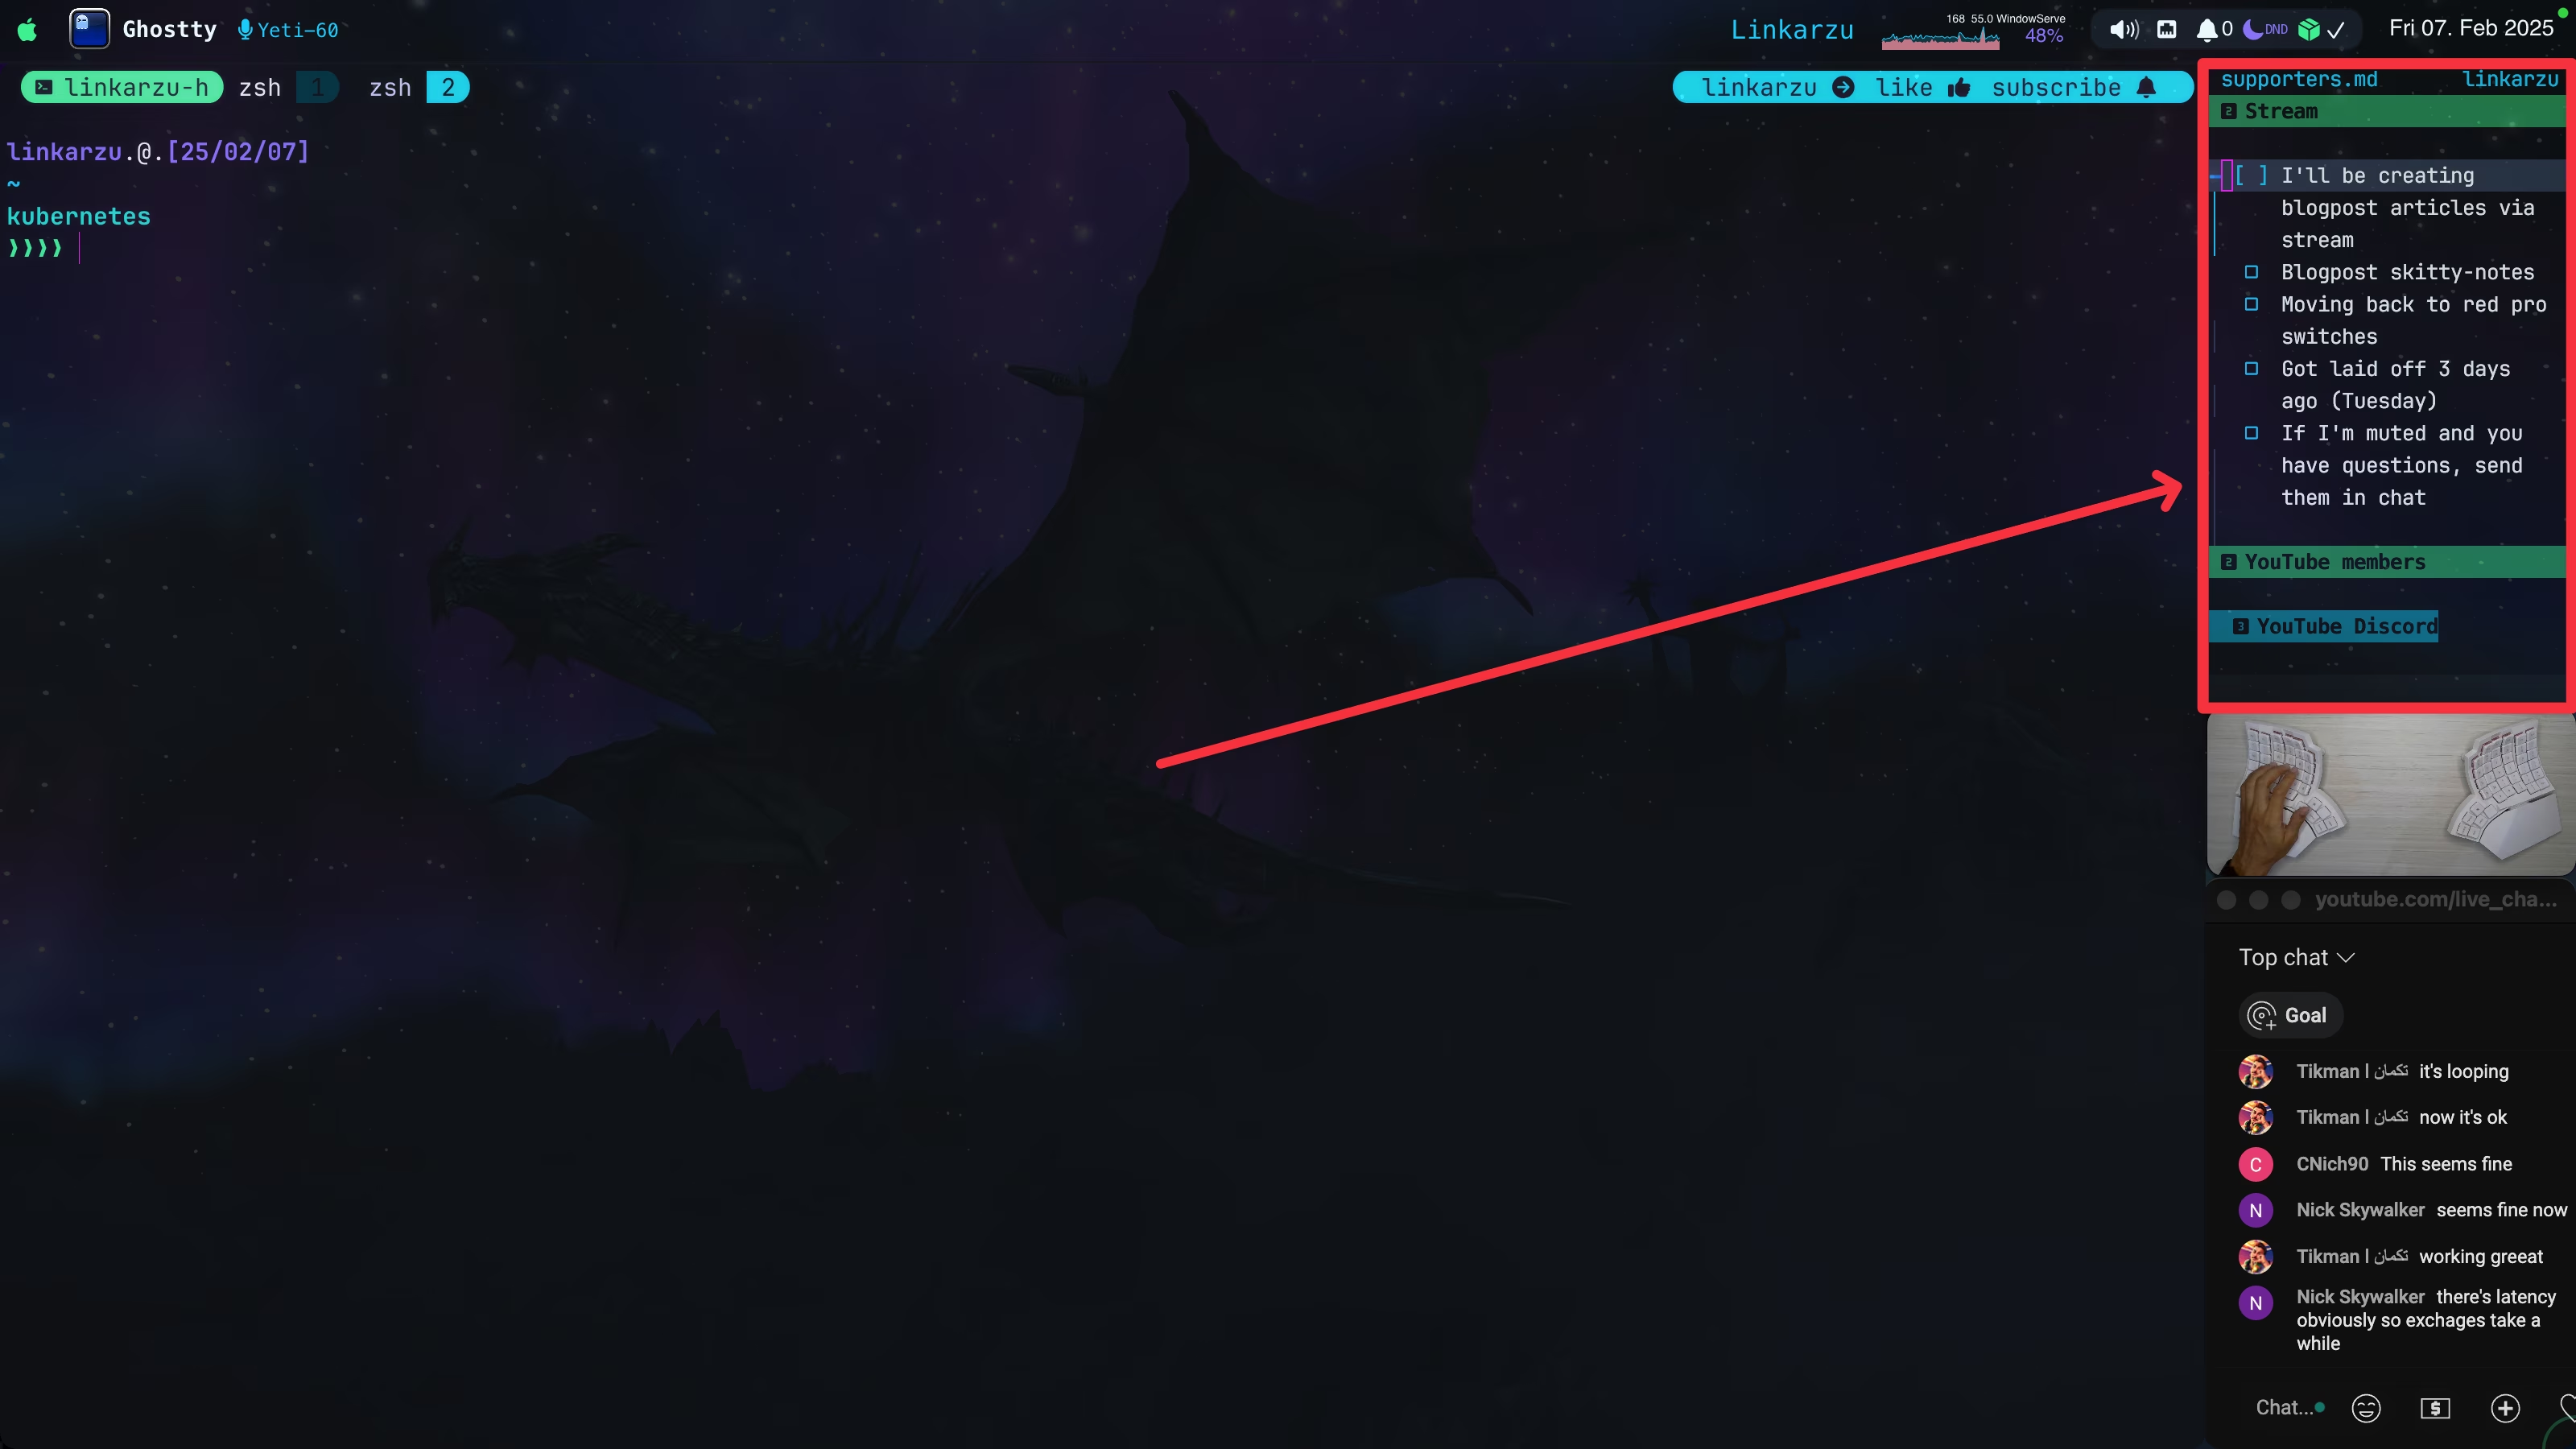 You can see skitty-notes on the right
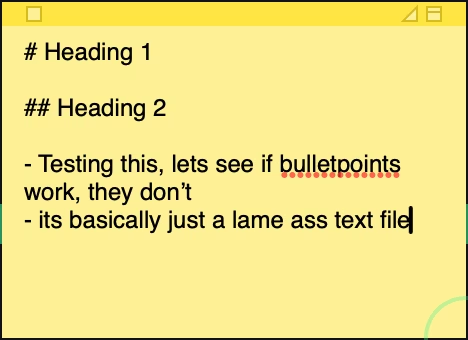 macOS Stickies app